×
Cómo crear un formulario de registro
Para crear nuestro formulario de registro util para paginas web de comercio, vamos agregar en primero lugar el codigo html
...Codigo del HTML
<button onclick="document.getElementById('id01').style.display='block'" style="width:auto;">Sign Up</button>
<div id="id01" class="modal">
  <span onclick="document.getElementById('id01').style.display='none'" class="close" title="Close Modal">×</span>
  <form style="width:600px" class="modal-content" action="/action_page.php">
    <div class="container">
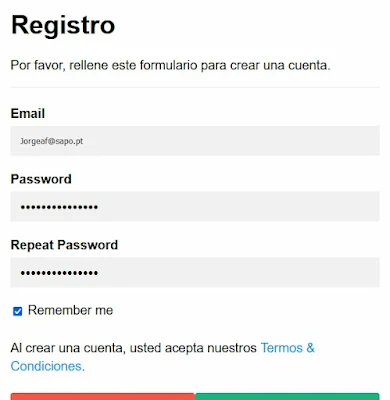
      <h1>Registro</h1>
      <p>Por favor, rellene este formulario para crear una cuenta.</p>
      <hr>
      <label for="email"><b>Email</b></label>
      <input type="text" placeholder="Enter Email" name="email" required>

      <label for="psw"><b>Password</b></label>
      <input type="password" placeholder="Enter Password" name="psw" required>

      <label for="psw-repeat"><b>Repeat Password</b></label>
      <input type="password" placeholder="Repeat Password" name="psw-repeat" required>

      <label>
        <input type="checkbox" checked="checked" name="remember" style="margin-bottom:15px"> Remember me
      </label>

      <p>Al crear una cuenta, usted acepta nuestros <a href="#" style="color:dodgerblue">Termos & Condiciones</a>.</p>

      <div class="clearfix">
        <button type="button" onclick="document.getElementById('id01').style.display='none'" class="cancelbtn">Cancel</button>
        <button type="submit" class="signupbtn">Registrar</button>
      </div>
    </div>
  </form>
</div><br>
El segundo paso agregamos los estilos del formulario, si no les gusta estos, lo pueden cambiar a vustro gusto usando CSS
Codigo del HTML
 body {font-family: Arial, Helvetica, sans-serif;}
 * {box-sizing: border-box;}

 /* Full-width input fields */
 input[type=text], input[type=password] {
   width: 100%;
   padding: 15px;
   margin: 5px 0 22px 0;
   display: inline-block;
   border: none;
   background: #f1f1f1;
 }

 /* Add a background color when the inputs get focus */
 input[type=text]:focus, input[type=password]:focus {
   background-color: #ddd;
   outline: none;
 }

 /* Set a style for all buttons */
 button {
   background-color: #04AA6D;
   color: white;
   padding: 14px 20px;
   margin: 8px 0;
   border: none;
   cursor: pointer;
   width: 100%;
   opacity: 0.9;
 }

 button:hover {
   opacity:1;
 }

 /* Extra styles for the cancel button */
 .cancelbtn {
   padding: 14px 20px;
   background-color: #f44336;
 }

 /* Float cancel and signup buttons and add an equal width */
 .cancelbtn, .signupbtn {
   float: left;
   width: 50%;
 }

 /* Add padding to container elements */
 .container {
   padding: 16px;
 }

 /* The Modal (background) */
 .modal {
   display: none; /* Hidden by default */
   position: fixed; /* Stay in place */
   z-index: 1; /* Sit on top */
   left: 0;
   top: 0;
   width: 100%; /* Full width */
   height: 100%; /* Full height */
   overflow: auto; /* Enable scroll if needed */
   background-color: #474e5d;
   padding-top: 50px;
 }

 /* Modal Content/Box */
 .modal-content {
   background-color: #fefefe;
   margin: 5% auto 15% auto; /* 5% from the top, 15% from the bottom and centered */
   border: 1px solid #888;
   width: 80%; /* Could be more or less, depending on screen size */
 }

 /* Style the horizontal ruler */
 hr {
   border: 1px solid #f1f1f1;
   margin-bottom: 25px;
 }

 /* The Close Button (x) */
 .close {
   position: absolute;
   right: 35px;
   top: 15px;
   font-size: 40px;
   font-weight: bold;
   color: #f1f1f1;
 }

 .close:hover,
 .close:focus {
   color: #f44336;
   cursor: pointer;
 }

 /* Clear floats */
 .clearfix::after {
   content: "";
   clear: both;
   display: table;
 }

 /* Change styles for cancel button and signup button on extra small screens */
 @media screen and (max-width: 300px) {
   .cancelbtn, .signupbtn {
      width: 100%;
   }
 }
Por ultimo agregamos el codigo del javascript, que es lo responsable por vermos y ocultarmos el formulario
Codigo del HTML
<script>
// Get the modal
var modal = document.getElementById('id01');

// When the user clicks anywhere outside of the modal, close it
window.onclick = function(event) {
  if (event.target == modal) {
    modal.style.display = "none";
  }
}
</script>


0 Comentarios
Si desea contactar comigo, lo puede hacer atravez deste formulario gracias